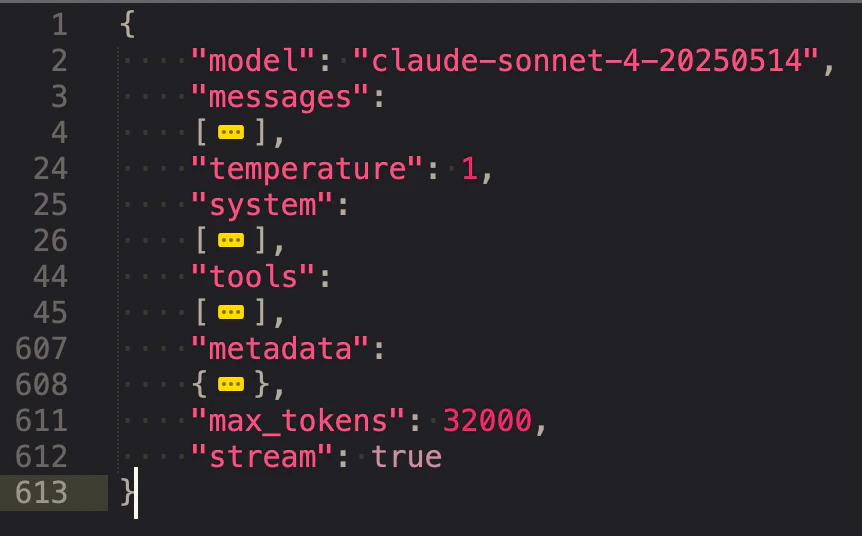
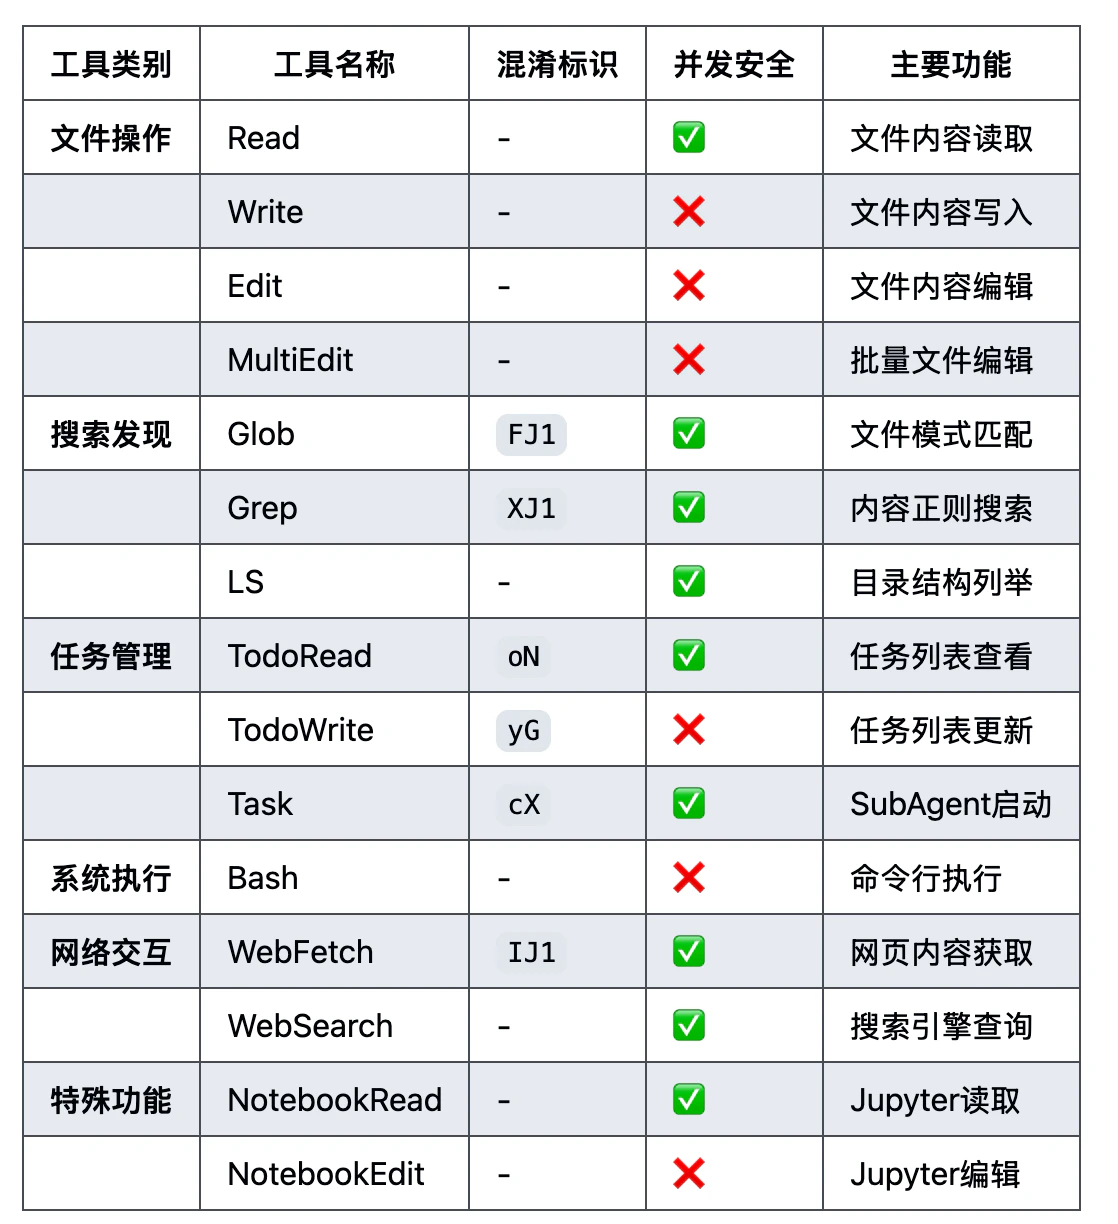
早期有些人寄希望于大模型能力提升能实现 AGI,但是现在慢慢地发现,工具调用才是现阶段模型最需要的,工具调用也是大模型与外界交互的一个窗口。现在流行的 Function CallingComputer-UseMCP(Model Context Protocol) 都是在这个方向延伸出来的。 这一篇我把函数调用和 MCP 放在了一起,是因为这些东西本质上都是一样的东西,只是早期刚开始没有任何标准的时候,各家模型都自我实现了一套函数调用,接下去我们会一一过一下工具调用的分类和演进

6.1 函数调用

最开始调用大模型时,是可以通过传入厂商预定义的结构化数据(JSON Schema),来告诉大模型一些预定义的工具可以使用,这个结构根据厂商的不同而不同,这个阶段大家一般称呼为函数调用(Function Calling)。最早可追溯到 OpenAI 的这篇 Function calling and other API updates,Anthropic 也在 2024 年 5 月宣布 Claude 支持 Tool Use(aka function calling)。 我们简单看一下 OpenAIGoogle 各自模型怎么调用工具的例子。 OpenAI 的:
curl -X POST https://api.openai.com/v1/responses \
  -H "Authorization: Bearer $OPENAI_API_KEY" \
  -H "Content-Type: application/json" \
  -d '{
    "model": "gpt-5",
    "input": [
      {"role": "user", "content": "What is the weather like in Paris today?"}
    ],
    "tools": [
      {
        "type": "function",
        "name": "get_weather",
        "description": "Get current temperature for a given location.",
        "parameters": {
          "type": "object",
          "properties": {
            "location": {
              "type": "string",
              "description": "City and country e.g. Bogotá, Colombia"
            }
          },
          "required": ["location"],
          "additionalProperties": false
        },
        "strict": true
      }
    ]
  }'
Google 的:
curl "https://generativelanguage.googleapis.com/v1beta/models/gemini-2.5-flash:generateContent" \
  -H "x-goog-api-key: $GEMINI_API_KEY" \
  -H 'Content-Type: application/json' \
  -X POST \
  -d '{
    "contents": [
      {
        "role": "user",
        "parts": [
          {
            "text": "What'\''s the temperature in London?"
          }
        ]
      }
    ],
    "tools": [
      {
        "functionDeclarations": [
          {
            "name": "get_current_temperature",
            "description": "Gets the current temperature for a given location.",
            "parameters": {
              "type": "object",
              "properties": {
                "location": {
                  "type": "string",
                  "description": "The city name, e.g. San Francisco"
                }
              },
              "required": ["location"]
            }
          }
        ]
      }
    ]
  }'
可以看到通过 JSON 的方式来定义函数,基本上是函数名、描述、相关字段和类型这些信息,都集中在调用时 tools 这个字段下,只不过下面的字段名有些许差异(这也是 MCP 流行的一个重要原因)。 现在我们来看看函数调用的一个流程,我们这边直接引用前面提到的 OpenAI 和 Google 的模型做函数调用时的流程图: 这个流程可以很清楚的看出,函数调用的流程是:
  1. 提供一组函数在上下文中
  2. 让大模型根据上下文来决定是否要调用函数
  3. 调用则返回对应格式的内容,如:get_weather("paris")
  4. 应用负责具体去执行这个函数,得到结果
  5. 将结果附带在上下文再次请求大模型
  6. 根据执行结果来决定后续的动作,比如告知用户完成任务了,或者还需要在执行其他任务
最后,我们从前面的 OpenAI 和 Google 的函数调用对比,可以非常明显的观测到,针对函数的定义是完全不一样的格式,这就造成了兼容的困难,也就是说系统里接入了多个模型的情况下,就有可能要写多个调用方式来兼容,这造成了极大的不便,在这种情况下,MCP 应运而生了

6.2 MCP

Anthropic 于 2024 年 11 月推出了 MCP(Model Context Protocol),经过几个月的沉淀,很多服务涌现,到 2025 年上半年,MCP 在非常短的时间内火出圈,所有人都在谈论 MCP,随着 Google、OpenAI 等主流的模型厂商都宣布并支持了 MCP 之后,这一开放标准已经成为 AI 时代函数调用的事实标准协议。 这张图展示了 MCP 的架构,虽然 MCP 里定义了:
  • Host:运行 LLM 应用的设备
  • Client:MCP 客户端,负责 LLM 和 Server 的通信,起到一个中介作用
  • Server:MCP 服务端,负责实际的逻辑,也可能调用外部的服务、命令等
我觉得可以更简化的理解,MCP 最主要的就是 MCP Server,包含了一些功能的一个服务,而客户端可以通过 MCP 协议去调用这个 Server,结果返回给大模型。引用一下这篇文章中的图: 可以很清晰地看清楚整个流程:
  1. 用户发送问题
  2. AI 应用连接到 MCP Server(这个过程有可能发生在应用启动的时候,在用户发送问题之前建立好连接)
  3. 获取工具列表(最常见的一个请求,不过 MCP 还支持获取提示词之类的资源),是 JSON 格式的数据
  4. 将用户问题和工具列表一起发送给大模型
  5. 大模型根据判断,如果不产生调用直接返回。如果产生调用就返回到 AI 应用
  6. AI 应用根据返回的信息知道请求哪个工具,参数是什么,组装后请求
  7. AI 应用得到 MCP Server 返回的结果
  8. AI 应用将工具执行后的结果再给到大模型(前面的聊天记录也会一起)
  9. 大模型做最后的结果输出
  10. AI 应用将最终结果返回给用户(整个周期期间可能已经通过流式不断返回了)
这是完整的流程,实际中根据应用形态、编排和业务等情况,有些步骤是非必要的。了解完架构和流程,整体有个印象了,现在我们深入了解一下 MCP 协议,至少知道实际使用中我们应该怎么选择。

6.2.1 MCP 协议

MCP 协议里最重要的当属传输协议(Transport Protocol),我写这篇文章的时候,MCP 标准演进到 2025-06-18 这个修订版了,目前支持的是:
  • Stdio:通过命令直接拉起 MCP Server
  • Streamable HTTP:通过流式 HTTP 去请求 MCP Server
最早的版本是 Stdio 和 SSE,但是因为 SSE 需要长期保持一个连接,且偏有状态,在很多场景下不适用,后来才演进成流式 HTTP。 这个其实也展现了 MCP 在业界的发展。我们可以理解 Stdio 更适用于 C 端的应用,比如我们用的 ChatGPT、Cursor 等,可以在端侧就直接连接和处理。而 HTTP 则支持一些远端的 MCP,尤其适合一些 B 端场景。比如高德地图 MCP,就是直接通过官方的 URL 连接使用。当然这个分类不是绝对的,只是按照经验来说是这个倾向。 值得一提的是,在 MCP 发展的阶段,出现了 Stdio、SSE、StreamableHTTP 三种协议互转的需求,也催生了很多开源项目,几个月前我开源的 Unla 正是处理这种需求的一个开源项目,并且更进一步,支持了反向代理存量的 HTTP 接口,这对于 B 端来说,可以快速通过配置化的方式将很多存量的 API 转成 MCP Server 而不需要任何代码的改造。另外还有一些情况下,因为接入太多 MCP Server 了,导致上下文膨胀得很厉害,因此也出现了一些 MCP Server 聚合的项目,将多个 MCP Servers 绑定到某个 MCP 下,甚至可以智能的选择激活的工具。这些都是 MCP 发展和普及过程中产生的一些衍生物。 用一个非常简单的代码来展示一下 MCP 是如何运作的:
#!/usr/bin/env python3
"""
Simple MCP Server for Teaching Purposes
使用 FastMCP 实现的简单教学服务器
支持三种传输协议:stdio, SSE, streamable HTTP
"""

import sys
from fastmcp import FastMCP

# 创建 MCP 服务器实例
mcp = FastMCP("Demo Teaching Server")


@mcp.tool()
def hello_world(name: str = "World") -> str:
    """
    简单的 Hello World 工具

    Args:
        name: 要问候的名字,默认为 "World"

    Returns:
        问候消息
    """
    return f"Hello, {name}! 👋"


@mcp.tool()
def ping_pong(message: str) -> str:
    """
    Ping-Pong 回声工具

    Args:
        message: 要发送的消息

    Returns:
        如果消息是 "ping" 返回 "pong",否则返回原消息的回声
    """
    if message.lower() == "ping":
        return "pong! 🏓"
    return f"Echo: {message}"


@mcp.tool()
def add_numbers(a: float, b: float) -> float:
    """
    简单的加法计算器

    Args:
        a: 第一个数字
        b: 第二个数字

    Returns:
        两个数字的和
    """
    return a + b


@mcp.tool()
def get_server_info() -> dict:
    """
    获取服务器信息

    Returns:
        服务器的基本信息
    """
    return {
        "name": "Demo Teaching Server",
        "version": "1.0.0",
        "description": "一个用于教学的简单 MCP 服务器",
        "tools_count": 4,
        "framework": "FastMCP"
    }


if __name__ == "__main__":
    import argparse

    parser = argparse.ArgumentParser(description="MCP Demo Server - 支持多种传输协议")
    parser.add_argument(
        "--transport",
        type=str,
        choices=["stdio", "sse", "http"],
        default="stdio",
        help="传输协议类型 (stdio/sse/http)"
    )
    parser.add_argument(
        "--host",
        type=str,
        default="127.0.0.1",
        help="HTTP/SSE 服务器主机地址 (默认: 127.0.0.1)"
    )
    parser.add_argument(
        "--port",
        type=int,
        default=8000,
        help="HTTP/SSE 服务器端口 (默认: 8000)"
    )

    args = parser.parse_args()

    # 根据传输协议类型运行服务器
    if args.transport == "stdio":
        print("🚀 启动 STDIO 传输模式...", file=sys.stderr)
        mcp.run(transport="stdio")
    elif args.transport == "sse":
        print(f"🚀 启动 SSE 传输模式 @ http://{args.host}:{args.port}/sse", file=sys.stderr)
        mcp.run(transport="sse", host=args.host, port=args.port)
    elif args.transport == "http":
        print(f"🚀 启动 HTTP (Streamable) 传输模式 @ http://{args.host}:{args.port}/mcp", file=sys.stderr)
        mcp.run(transport="http", host=args.host, port=args.port, path="/mcp")
定义了 4 个工具,并且同时支持了 Stdio, SSE, Streamable HTTP,我们使用 Inspector 来连接一下 Stdio 是直接通过命令的方式拉起运行,通信方式是通过 STDIN 和 STDOUT,简单理解就是在命令行里输入请求(符合 MCP 定义的规范 JSON-RPC),然后接收响应的内容。流程如下: 更具体的内容可以参考官方文档。接下来是 SSE 和 StreamableHTTP 都是一样需要提前运行 MCP Server,会通过监听 HTTP 来接受 MCP Client 的请求。SSE 通常以 /sse 结尾,通过 /message 发送消息,而 Streamable HTTP 则都是通过 /mcp 这边我们通过几个连续的 curl 请求来展示一下 Streamable HTTP 的实际流程:
  1. initialize:初始化,这步最关键的时一定要拿到 HTTP 响应头里的 mcp-session-id,后续都是基于这个会话 id 进行的
  2. notifications/initialized:客户端初始化完后通知服务端,需要在 HTTP 请求头里增加 mcp-session-id,收到的 HTTP 响应不是 200,而是 202
  3. tools/list:客户端请求工具列表
  4. tools/call:客户端根据前面的工具列表里的一些定义(如请求参数和类型),调用某个工具得到结果
所有涉及的命令如下:
# 1. initialize
curl --location 'http://localhost:8000/mcp' \
--header 'Accept: application/json, text/event-stream' \
--header 'Content-Type: application/json' \
--data '{
    "method": "initialize",
    "params": {
        "protocolVersion": "2024-11-05",
        "capabilities": {},
        "clientInfo": {
            "name": "mcp-inspector",
            "version": "0.7.0"
        }
    },
    "jsonrpc": "2.0",
    "id": 0
}' -i


# 2. notifications/initialized
curl --location 'http://localhost:8000/mcp' \
--header 'Accept: application/json, text/event-stream' \
--header 'Mcp-Session-Id: 744f2f9dd0b84c419fb97d3a933534db' \
--header 'Content-Type: application/json' \
--data '{
    "method": "notifications/initialized",
    "jsonrpc": "2.0"
}' -i

# 3. tools/list
curl --location 'http://localhost:8000/mcp' \
--header 'Accept: application/json, text/event-stream' \
--header 'Mcp-Session-Id: 744f2f9dd0b84c419fb97d3a933534db' \
--header 'Content-Type: application/json' \
--data '{
    "method": "tools/list",
    "params": {},
    "jsonrpc": "2.0",
    "id": 1
}' -i

# 4. tools/call
curl --location 'http://localhost:8000/mcp' \
--header 'Accept: application/json, text/event-stream' \
--header 'Mcp-Session-Id: 744f2f9dd0b84c419fb97d3a933534db' \
--header 'Content-Type: application/json' \
--data '{
    "method": "tools/call",
    "params": {
        "name": "hello_world",
        "arguments": {
            "name": "Leo"
        },
        "_meta": {
            "progressToken": 1
        }
    },
    "jsonrpc": "2.0",
    "id": 2
}' -i
可以看出,实际上 MCP 的通信协议没什么神秘的,MCP 带来的好处并不是技术上的革新,而是统一协议,这样服务提供方和用户都可以有共识,就好像 HTTP 本质上也是基于 TCP 传输,但是正是因为有了开放协议,制定了标准之后,才有了网站和各类 APP 的繁荣发展。

6.2.2 Claude Code

了解完 MCP 协议,我们结合 Claude Code 来看看 MCP 如何结合在实际应用中的。 Claude Code(下称为 CC)作为 Anthropic 的 AI Agent,目前被很多人使用,我们可以通过系统提示词看到 CC 是通过 MCP 定义工具的,总体的工具如下(v1.*): 我们可以在请求的 tools 里看到对应的工具定义 我们看看 Bash 的定义
{
    "name": "Bash",
    "description": "Executes a given bash command in a persistent shell session with optional timeout, ensuring proper handling and security measures.\n\nBefore executing the command, please follow these steps:\n\n1. Directory Verification:\n   - If the command will create new directories or files, first use the LS tool to verify the parent directory exists and is the correct location\n   - For example, before running \"mkdir foo/bar\", first use LS to check that \"foo\" exists and is the intended parent directory\n\n2. Command Execution:\n   - Always quote file paths that contain spaces with double quotes (e.g., cd \"path with spaces/file.txt\")\n   - Examples of proper quoting:\n     - cd \"/Users/name/My Documents\" (correct)\n     - cd /Users/name/My Documents (incorrect - will fail)\n     - python \"/path/with spaces/script.py\" (correct)\n     - python /path/with spaces/script.py (incorrect - will fail)\n   - After ensuring proper quoting, execute the command.\n   - Capture the output of the command.\n\nUsage notes:\n  - The command argument is required.\n  - You can specify an optional timeout in milliseconds (up to 600000ms / 10 minutes). If not specified, commands will timeout after 120000ms (2 minutes).\n  - It is very helpful if you write a clear, concise description of what this command does in 5-10 words.\n  - If the output exceeds 30000 characters, output will be truncated before being returned to you.\n  - VERY IMPORTANT: You MUST avoid using search commands like `find` and `grep`. Instead use Grep, Glob, or Task to search. You MUST avoid read tools like `cat`, `head`, `tail`, and `ls`, and use Read and LS to read files.\n - If you _still_ need to run `grep`, STOP. ALWAYS USE ripgrep at `rg` first, which all ${PRODUCT_NAME} users have pre-installed.\n  - When issuing multiple commands, use the ';' or '&&' operator to separate them. DO NOT use newlines (newlines are ok in quoted strings).\n  - Try to maintain your current working directory throughout the session by using absolute paths and avoiding usage of `cd`. You may use `cd` if the User explicitly requests it.\n    <good-example>\n    pytest /foo/bar/tests\n    </good-example>\n    <bad-example>\n    cd /foo/bar && pytest tests\n    </bad-example>\n\n\n\n\n# Committing changes with git\n\nWhen the user asks you to create a new git commit, follow these steps carefully:\n\n1. You have the capability to call multiple tools in a single response. When multiple independent pieces of information are requested, batch your tool calls together for optimal performance. ALWAYS run the following bash commands in parallel, each using the Bash tool:\n  - Run a git status command to see all untracked files.\n  - Run a git diff command to see both staged and unstaged changes that will be committed.\n  - Run a git log command to see recent commit messages, so that you can follow this repository's commit message style.\n2. Analyze all staged changes (both previously staged and newly added) and draft a commit message:\n  - Summarize the nature of the changes (eg. new feature, enhancement to an existing feature, bug fix, refactoring, test, docs, etc.). Ensure the message accurately reflects the changes and their purpose (i.e. \"add\" means a wholly new feature, \"update\" means an enhancement to an existing feature, \"fix\" means a bug fix, etc.).\n  - Check for any sensitive information that shouldn't be committed\n  - Draft a concise (1-2 sentences) commit message that focuses on the \"why\" rather than the \"what\"\n  - Ensure it accurately reflects the changes and their purpose\n3. You have the capability to call multiple tools in a single response. When multiple independent pieces of information are requested, batch your tool calls together for optimal performance. ALWAYS run the following commands in parallel:\n   - Add relevant untracked files to the staging area.\n   - Create the commit with a message ending with:\n   🤖 Generated with [Claude Code](https://claude.ai/code)\n\n   Co-Authored-By: Claude <noreply@anthropic.com>\n   - Run git status to make sure the commit succeeded.\n4. If the commit fails due to pre-commit hook changes, retry the commit ONCE to include these automated changes. If it fails again, it usually means a pre-commit hook is preventing the commit. If the commit succeeds but you notice that files were modified by the pre-commit hook, you MUST amend your commit to include them.\n\nImportant notes:\n- NEVER update the git config\n- NEVER run additional commands to read or explore code, besides git bash commands\n- NEVER use the TodoWrite or Task tools\n- DO NOT push to the remote repository unless the user explicitly asks you to do so\n- IMPORTANT: Never use git commands with the -i flag (like git rebase -i or git add -i) since they require interactive input which is not supported.\n- If there are no changes to commit (i.e., no untracked files and no modifications), do not create an empty commit\n- In order to ensure good formatting, ALWAYS pass the commit message via a HEREDOC, a la this example:\n<example>\ngit commit -m \"$(cat <<'EOF'\n   Commit message here.\n\n   🤖 Generated with [Claude Code](https://claude.ai/code)\n\n   Co-Authored-By: Claude <noreply@anthropic.com>\n   EOF\n   )\"\n</example>\n\n# Creating pull requests\nUse the gh command via the Bash tool for ALL GitHub-related tasks including working with issues, pull requests, checks, and releases. If given a Github URL use the gh command to get the information needed.\n\nIMPORTANT: When the user asks you to create a pull request, follow these steps carefully:\n\n1. You have the capability to call multiple tools in a single response. When multiple independent pieces of information are requested, batch your tool calls together for optimal performance. ALWAYS run the following bash commands in parallel using the Bash tool, in order to understand the current state of the branch since it diverged from the main branch:\n   - Run a git status command to see all untracked files\n   - Run a git diff command to see both staged and unstaged changes that will be committed\n   - Check if the current branch tracks a remote branch and is up to date with the remote, so you know if you need to push to the remote\n   - Run a git log command and `git diff [base-branch]...HEAD` to understand the full commit history for the current branch (from the time it diverged from the base branch)\n2. Analyze all changes that will be included in the pull request, making sure to look at all relevant commits (NOT just the latest commit, but ALL commits that will be included in the pull request!!!), and draft a pull request summary\n3. You have the capability to call multiple tools in a single response. When multiple independent pieces of information are requested, batch your tool calls together for optimal performance. ALWAYS run the following commands in parallel:\n   - Create new branch if needed\n   - Push to remote with -u flag if needed\n   - Create PR using gh pr create with the format below. Use a HEREDOC to pass the body to ensure correct formatting.\n<example>\ngh pr create --title \"the pr title\" --body \"$(cat <<'EOF'\n## Summary\n<1-3 bullet points>\n\n## Test plan\n[Checklist of TODOs for testing the pull request...]\n\n🤖 Generated with [Claude Code](https://claude.ai/code)\nEOF\n)\"\n</example>\n\nImportant:\n- NEVER update the git config\n- DO NOT use the TodoWrite or Task tools\n- Return the PR URL when you're done, so the user can see it\n\n# Other common operations\n- View comments on a Github PR: gh api repos/foo/bar/pulls/123/comments",
    "input_schema":
    {
        "type": "object",
        "properties":
        {
            "command":
            {
                "type": "string",
                "description": "The command to execute"
            },
            "timeout":
            {
                "type": "number",
                "description": "Optional timeout in milliseconds (max 600000)"
            },
            "description":
            {
                "type": "string",
                "description": " Clear, concise description of what this command does in 5-10 words. Examples:\nInput: ls\nOutput: Lists files in current directory\n\nInput: git status\nOutput: Shows working tree status\n\nInput: npm install\nOutput: Installs package dependencies\n\nInput: mkdir foo\nOutput: Creates directory 'foo'"
            }
        },
        "required":
        [
            "command"
        ],
        "additionalProperties": false,
        "$schema": "http://json-schema.org/draft-07/schema#"
    }
}
MCP 是 Anthropic 推行的标准,自然快速在自家产品采用了,我们可以看到,在 AI Agent 中需要有一个 MCP Client 的模块,这样才可以完成前面提到的流程,去获取对应的工具列表给拼接到上下文中给到大模型,最后从大模型返回的上下文拿到需要执行的工具,再调用 MCP Server 进行执行。 现在很多 AI Agent 集成了 MCP 调用的能力,可以通过配置的方式进行调用,比如 CC 的下可以用 .mcp.json
{
  "mcpServers": {
    "demo-server-stdio": {
      "command": "python",
      "args": ["/Users/ifuryst/projects/github/MCP-demo/server.py"],
      "env": {
        "DEMO_API_KEY": "stdio-key-12345",
        "DEMO_ENV": "development"
      }
    },
    "demo-server-sse": {
      "type": "sse",
      "url": "http://127.0.0.1:8001/sse",
      "headers": {
        "X-API-Key": "sse-key-67890",
        "X-Environment": "testing"
      }
    },
    "demo-server-http": {
      "type": "http",
      "url": "http://127.0.0.1:8002/mcp",
      "headers": {
        "X-API-Key": "http-key-abcde",
        "X-Environment": "production"
      }
    }
  }
}

6.3 总结

这章的篇幅不长,很快的就将工具调用相关的内容过完,实际应用中不一定局限在函数调用或 MCP,具体例子是这几天 Anthropic 推出的 Claude Skills,给出了一个很实在的例子。我们在实际的 AI 应用研发中,关注 MCP 是为了关注协议兼容,可以快速享用一些协议带来的好处,包括商业机会、开源复用等等。而使用函数调用可能更多是一方的工具快速集成、性能最大化等作用,在此基础之上是可以类似 Calude Skills 一样做一定的扩展,扩宽一点大模型的边界,让大模型拥有更多的能力支撑更复杂的业务场景(这也是模型能力持续提升带来的转变)。 最终回归到工具使用,目前更多是服务于 AI Agent,在 AI Agent 中工具的使用主要集中在这么几个重点上:
  1. 工具的集成:根据 Agent 的不同,可以集成不同的工具,最常见的有 ShellExec、FileOp、BrowserUse、APICall 等
  2. 定义和加载工具:现在基本可以依据 MCP 做定义了,至于加载可以启动时加载也可以运行时加载,更可以通过一些更智能的手段加载必要的工具
  3. 执行和结果收集:这个主要是 Agent 内部的流程实现
  4. 结果卸载:AI Agent 长时段(Long-horizon)运行基本上上下文会被各种工具调用的结果塞满,如何抽离卸载工具执行结果是上下文管理中很重要的一部分
有了工具调用的 AI Agent,拥有了与外界交互的能力,结合前面的提到记忆系统和持久化能力,大模型的应用从一来一回的多轮次对话式生成进入到了可自主决策执行的阶段了。接下去我们就会以可自主执行的 AI Agent 为核心去结合前面了解的技术来深入 AI Agent 的内部。
I